Summary
This guide shows how to choose, cut, and style a low textured fringe so it flatters every face shape. You will get practical tips for oval, round, square, heart, diamond, and long faces. Learn product suggestions, barber instructions, simple styling routines, and common mistakes to avoid. Read on for step by step techniques that are easy to apply at home or hand to your barber.
Why choose a low textured fringe
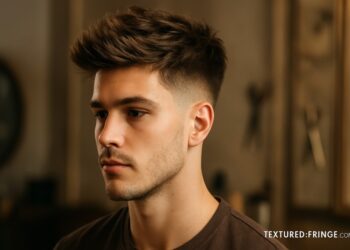
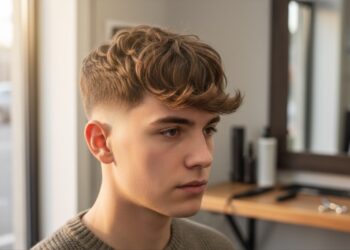
A low textured fringe sits just above the eyebrows or slightly lower and has soft layers and separation to create movement. It softens strong features, adds youthfulness, and works with many hair types. For anyone who wants a modern casual look that is low maintenance and highly customizable, the low textured fringe is an excellent choice.
What is a low textured fringe
A low textured fringe is a front section of hair cut shorter than the rest, with visible layering and movement. Texture is created by point cutting, thinning, or slide cutting. The result is a fringe that looks lived in and not heavy or blunt.
Who benefits most
- Teens and young adults who want a relaxed look
- Barbers and stylists looking for an adaptable fringe to offer clients
- Anyone who needs a face framing style that is forgiving and easy to style
How to determine face shape quickly
Measure or visually compare these areas
- Forehead width
- Cheekbone width
- Jawline width
- Face length
If cheekbones are widest, you likely have a round face. If length is greater than width, you likely have an oval or long face. Use these observations to match the right fringe style in the sections below.
Styling guidelines by face shape
Oval face
Why this works
Oval faces are balanced, which makes them the most versatile for fringes.
How to style a low textured fringe for an oval face
- Keep fringe length just above the eyebrows to maintain balance.
- Add light texture through point cutting so the fringe falls naturally.
- Use a small amount of light hold product to keep movement without stiffness.
Quick tip
A soft side part can add casual asymmetry while preserving natural balance.
Round face
Why this works
A low textured fringe can help create the illusion of length and structure.
How to style a low textured fringe for a round face
- Keep more length at the center so the fringe creates a vertical line.
- Add volume at the crown rather than at the sides to avoid widening the face.
- Use a dryer and a round brush to lift roots at the crown then finger style the fringe.
Quick tip
A slightly off center part slims the face while textured ends keep the look modern.
Square face
Why this works
Textured edges soften a strong jawline and reduce the starkness of angular features.
How to style a low textured fringe for a square face
- Soften the fringe edge with lots of texture rather than a blunt cut.
- Keep fringe length longer on the sides to blend into the temples.
- Use a matte styling paste to define pieces without shine.
Quick tip
Avoid blunt straight across fringes unless the client wants a bold, graphic look.
Heart shaped face
Why this works
A low textured fringe balances a wider forehead and a narrower chin.
How to style a low textured fringe for a heart shaped face
- Keep the fringe slightly fuller in the center to balance the forehead.
- Feather the sides so the fringe blends into length at the jaw.
- Use sea salt spray to create light separation and a soft finish.
Quick tip
Side sweeping the fringe slightly can minimize forehead width.
Diamond face
Why this works
Diamond faces benefit from width at the forehead and chin which a fringe can help create.
How to style a low textured fringe for a diamond face
- Keep a soft, rounded fringe at the hairline to reduce sharp angles.
- Add texture at the ends so the fringe does not cling to the forehead.
- Use a light cream for a natural, flexible hold.
Quick tip
Avoid making the fringe too thin through the middle because this emphasizes cheekbone width.
Long or oblong face
Why this works
A longer fringe shortens perceived face length and adds horizontal emphasis.
How to style a low textured fringe for a long face
- Keep the fringe a touch longer and more horizontal to visually shorten the face.
- Add density through layering so the fringe has presence without heaviness.
- Use a blow dryer with fingers to set the fringe flat rather than lifted.
Quick tip
Avoid too much height at the crown which would lengthen the face further.
Cutting tips for barbers and stylists
- Start with clean, dry hair so texture and natural fall are visible.
- Use point cutting to create broken edges and avoid a harsh line.
- Always consider hair density and growth pattern when deciding length.
- If the client has cowlicks at the front, leave slightly more length so the hair can be trained.
- Show the client how the fringe looks when it is styled and when it is air dried.
At home styling routine, step by step
- Wash and towel dry hair until damp.
- Apply a small amount of leave in cream or light mousse through the fringe.
- Use a hair dryer and fingers or a small brush to direct the fringe where you want it to sit.
- Finish with a pea size of matte paste or light wax, rubbing between fingers and pulling through the ends.
- For a piecey look, twist small sections between index and thumb and pinch to separate.
Product recommendations by function
- Volume and lift: lightweight mousse or root lifter
- Texture and separation: sea salt spray or texture spray
- Hold and definition: matte paste or light wax
- Smooth finish and frizz control: light hair cream or serum
Choose products based on hair type rather than trends. Fine hair needs lighter textures, thick hair can handle stronger pastes.
Maintenance and care
- Trim every 4 to 6 weeks to keep shape and avoid a heavy fall into the eyes.
- Wash frequency depends on scalp oiliness and product use. For product heavy styling, clarify once per week.
- Condition the ends to prevent dryness from texturizing and layering.
- Protect hair from heat by using a thermal protectant before blow drying or straightening.
Common mistakes and how to avoid them
- Cutting too blunt: avoid a heavy edge by using texture cutting techniques.
- Too much product: start small and build, over product makes the fringe look stiff and fake.
- Ignoring growth patterns: consult with a barber about cowlicks and natural fall before cutting.
- Over thinning: too much thinning creates a see through fringe that lacks presence.
Quick styling routines for busy mornings
- Five minute routine for fine hair
- Spray lightweight mousse at roots and comb through.
- Blow dry with fingers to lift.
- Lightly apply paste and run through ends.
- Five minute routine for thick hair
- Spritz sea salt spray and scrunch.
- Blow dry while smoothing with a flat brush.
- Use a small amount of paste to separate pieces.
How to talk to your barber
- Bring photos showing the exact length and texture you want.
- Use clear terms like low textured fringe, soft layers, and point cutting.
- Ask the barber to show you how the fringe looks fresh and when styled.
- Request a small trim between appointments if you prefer shorter maintenance cycles.
Final thoughts
A low textured fringe is a versatile style that can be adapted to almost every face shape with the right length, texture, and routine. Focus on texture not on blunt weight. Communicate with your barber, use the right products for your hair type, and practice a simple styling routine that fits your mornings. With small adjustments you can create a signature look that is modern, effortless, and flattering.
If you want, try one of the styling routines for a week and note what feels natural. Then tweak length or texture with your barber until it becomes your perfect low textured fringe.